【译】浅析 React Hooks
January 08, 2020
React Hooks 在 React 16.7 版本发布后,在社区掀起了一股新的浪潮,真的是谁用谁都说真香。刚使用 Hooks 时难免会对该机制的原理感到神奇,在遇到问题时,由于它背后复杂的调用栈我们很难进行调试,所以有必要更深层次了解 React Hooks 系统,这样我们遇到问题可以快速定位甚至提前避免。今天我们就来看一下 React 是如何实现的?
首先让我们来了解一下确保 hooks 在 React 作用域内被调用的机制,因为如果没有在正确的上下文执行 hooks 是没有意义的:
The dispatcher
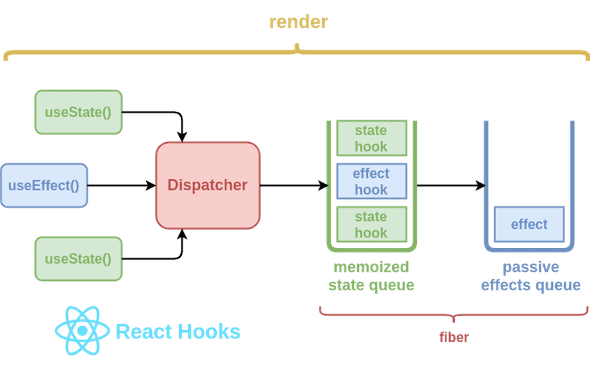
dispatcher 是一个包含 hooks 函数的共享的对象。它在 ReactDOM 渲染的时期动态地被分配或被清除,并保证用户在 React 组件外不能访问 hooks(源码实现)。
dispatcher 在每个和每次 hook 调用时通过 resolveDispatcher() 函数来处理(源码实现)。
let currentDispatcher;

const dispatcherWithHooks = {
  /* ... */
};

function resolveDispatcher() {
  if (currentDispatcher) return currentDispatcher;
  throw Error("Hooks can't be called");
}

function useXXX(...args) {
  const dispatcher = resolveDispatcher();
  return dispatcher.useXXX(...args);
}

function renderRoot() {
  currentDispatcher = dispatcherWithHooks;
  performWork();
  currentDispatcher = null;
}我们有了初步认识,现在正式来了解 hooks。首先介绍一个新概念:
The hooks queue
在底层,hooks 在它们调用顺序中作为 node 节点链接在一起。它们如此表现是因为 hooks 并不是简单地创建和销毁。它们通过一种机制来实现。每个 hook 有多个属性:
- 在初始渲染时创建它的初始状态
- 它们的状态随时可以更新
- React 在将来的渲染时能够记住 hook 的状态
- React 能够基于调用顺序提供正确的状态
- React 知道 hook 属于哪个 fiber
相应的,我们需要重新思考我们看待组件状态的方式。目前为止我们理解的是简单的对象:
{
  foo: 'foo',
  bar: 'bar',
  baz: 'baz',
}
但是当处理 hooks 时,它们应该被当作队列来看待,每个节点代表了状态中的每个 model:
{
  memoizedState: 'foo',
  next: {
    memoizedState: 'bar',
    next: {
      memoizedState: 'baz',
      next: null
    }
  }
}
每个 hook 节点的 schema 的实现,hook 上这些属性重点关注 memoizedState 和 next,其他的属性专门用于 useReducer() hook 来缓存 dispatched actions 和 基础状态来保证在大多数情况下 reduction 过程可以作为 fallback 重复执行:
baseState- 传入 reducer 的 state 对象baseUpdate- 创建baseState的最新 dispatched actionqueue- dispatched actions 的最新队列,等待传入 reducer
回到 hooks,在每个及每次函数组件调用前,prepareHooks() 函数会先调用,当前的 fiber 和在 hooks 队列中的的第一个节点被保存在全局的变量中。通过这种方式,每次我们调用 hook 函数(useXXX())它都知道要在哪个上下文执行。
let currentlyRenderingFiber;
let workInProgressQueue;
let currentHook;

function prepareHooks(recentFiber) {
  currentlyRenderingFiber = workInProgressFiber;
  currentHook = recentFiber.memoizedState;
}

function finishHooks() {
  currentlyRenderingFiber.memoizedState = workInProgressHook;
  currentlyRenderingFiber = null;
  workInProgressHook = null;
  currentHook = null;
}

function resolveCurrentlyRenderingFiber() {
  if (currentlyRenderingFiber) return currentlyRenderingFiber;
  throw Error("Hooks can't be called");
}

function createWorkInProgressHook() {
  workInProgressHook = currentHook ? cloneHook(currentHook) : createNewHook();
  currentHook = currentHook.next;
}

function useXXX() {
  const fiber = resolveCurrentlyRenderingFiber();
  const hook = createWorkInProgressHook();
  // ...
}

function updateFunctionComponent(
  recentFiber,
  workInProgressFiber,
  Component,
  props
) {
  prepareHooks(recentFiber, workInProgressFiber);
  Component(props);
  finishHooks();
}一旦更新结束,finishHooks() 函数会被调用,在 hooks 队列中的第一个节点的引用会存储在渲染过的 fiber 的 memoizedState 属性中。这意味着 hooks 队列和它的状态可以在外部被定位:
const ChildComponent = () => {
  useState('foo');
  useState('bar');
  useState('baz');

  return null;
};

const ParentComponent = () => {
  const childFiberRef = useRef();

  useEffect(() => {
    let hookNode = childFiberRef.current.memoizedState;

    assert(hookNode.memoizedState, 'foo');
    hookNode = hooksNode.next;
    assert(hookNode.memoizedState, 'bar');
    hookNode = hooksNode.next;
    assert(hookNode.memoizedState, 'baz');
  });

  return <ChildComponent ref={childFiberRef} />;
};我们来看一下更详细的独立的 hooks,首先看一下常见的 state hook:
State hooks
或许会感到奇怪,但是 useState hook 在底层使用了 useReducer hook 并简单提供了一个预定义的 reducer(查看实现)。这就是说 useState 返回的结果实际是一个 reducer state 和一个 action dispatcher。
function basicStateReducer(state, action) {
  return typeof action === 'function' ? action(state) : action;
}
state setter 还可以基于父组件当前的状态执行变更,而不需要传入不同的 prop:
const ParentComponent = () => {
  const [name, setName] = useState();

  return <ChildComponent toUpperCase={setName} />;
};

const ChildComponent = props => {
  useEffect(() => {
    props.toUpperCase(state => state.toUpperCase());
  }, [true]);

  return null;
};
最后我们来看一下 effect hook,在组件生命周期起了什么主要作用和如何工作的:
Effect hooks
Effect hook 表现有些不同,并且有个额外的逻辑层:
- 在渲染时创建,但是在绘制结束时执行
- 如果提供了,它们会在下次绘制前被销毁
- 它们的调用根据定义时的顺序执行
每个 fiber 的 hooks 队列中保存了 effect 节点。每个 effect 的类型不同,应在合适的阶段执行:
- 在更新前执行
getSnapshotBeforeUpdate()(实现) - 执行所有的插入,更新,删除和卸载(实现)
- 执行所有生命周期函数和 ref 回调函数。生命周期的函数单独执行,在整棵树的所有插入,更新删除都已被执行。该执行也触发了渲染器特定的初始 effects。(实现)
- Effects 是通过
useEffect()hook 调度(实现)
当执行到 effect hooks 时,它们被存在 fiber 的 udpateQueue 属性中,每个 effect 节点有以下 schema(实现):
tag- 二级制数指定了 effect 的行为create- 绘制结束后应该执行的回调destory-create()返回的回调函数,应该在初次渲染后执行inputs- 一些值得集合决定 effect 应该销毁和重建next- 在函数组件中定义的下一个 effect 的引用
除了 tag 属性之外,其他属性比较直接和易懂。 tag 是一些二级制值的组合:
const NoEffect = /*             */ 0b00000000;
const UnmountSnapshot = /*      */ 0b00000010;
const UnmountMutation = /*      */ 0b00000100;
const MountMutation = /*        */ 0b00001000;
const UnmountLayout = /*        */ 0b00010000;
const MountLayout = /*          */ 0b00100000;
const MountPassive = /*         */ 0b01000000;
const UnmountPassive = /* */ 0b10000000;对于这些二进制值常用的有管道符(|)并按位添加到单个值。然后通过连字符(&)来检测 tag 是否实现了某中类型。如果结果非 0,意味着 tag 指定了具体的行为。
const effectTag = MountPassive | UnmountPassive;
assert(effectTag, 0b11000000);
assert(effectTag & MountPassive, 0b10000000);
以下是 React 支持的 effect hook 类型:
- Default effect —
UnmountPassive | MountPassive - Mutation effect —
UnmountSnapshot | MountMutation - Layout effect —
UnmountMutation | MountLayout
以下是 React 如何检测表现实现的:
if ((effect.tag & unmountTag) !== NoHookEffect) {
  // Unmount
}

if ((effect.tag & mountTag) !== NoHookEffect) {
  // Mount
}
基于我们已经了解的 effect hooks,我们可以从外部注入 effect 到一个确切的 fiber:
function injectEffect(fiber) {
  const lastEffect = fiber.updateQueue.lastEffect

  const destroyEffect = () => {
    console.log('on destroy')
  }

  const createEffect = () => {
    console.log('on create')
    return destroy
  }

  const injectedEffect = {
    tag: 0b11000000,
    next: lastEffect.next,
    create: createEffect,
    destroy: destroyEffect,
    inputs: [createEffect],
  }

  lastEffect.next = injectedEffect
}

const ParentComponent = <ChildComponent ref={injectEffect}>
参考
https://medium.com/the-guild/under-the-hood-of-reacts-hooks-system-eb59638c9dba
